13 Clever DIY Tricks for Sparkling Clean Cars
Plan Out the Wash
The secret to a successful do-it-yourself car detail lies in setting yourself up for victory from the very beginning. Prior to getting started with washing your vehicle, ensure you have all the necessary tools at hand and map out your approach to make the most efficient use of your time and energy.
Opt for Microfiber Tools
Sponges capture and hold dirt and grit in their large pores. You can wring yours out, but the grit will stay put when car cleaning. Once grit is embedded, you may as well wash your car with sandpaper. Detailers use a microfiber car wash mitt Since the sediment settles as you rinse, it will enhance your homemade car washing experience.
Sponges absorb water, yet they fail to collect any remaining debris after washing. In contrast, these particles tend to embed themselves into your paint surface. Conversely, a microfiber cloth gathers such particles effectively. Afterward, rinse the cloth with fresh water to eliminate the grit. Subsequently squeeze out excess water and continue wiping down the area.
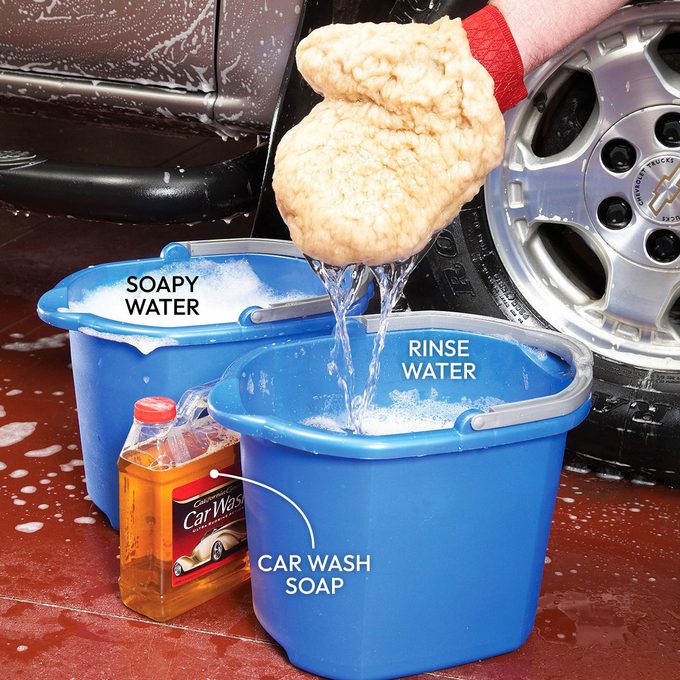
Clean with the Proper Lather
Although hand dishwashing detergent effectively cuts through grime, it isn’t suitable for cleaning your car’s exterior. While it does remove dirt, grease, and old wax, it strips away essential oils from the paint surface as well. Frequent use can damage your painted finish over time. Automotive detailers opt for specialized soaps instead, and you should too if you’re planning to tackle this task yourself.
Rather than using dish soap for your homemade car washing solution, opt for a cleaner specifically designed for automobiles. After preparing the soapy mixture, prepare another bucket filled solely with fresh rinsing water. Utilize this second bucket frequently to cleanse your wash mitt. This practice will help eliminate much of the dirt and debris caught in the mitt, thus avoiding potential scratches during cleaning.
Rinse Before Washing
If you hit your dry paint with soapy water, you’ll just grind the surface dust and road grit into your paint finish. Professional detailers always start with a clear water rinse to remove as much dust and dirt as possible.
Move the Seats Forward and Clear Out the Clutter
You might be astonished at what’s hiding behind the seats. Among our discoveries were an abandoned mobile phone, more writing utensils than needed to stock a tiny workspace, and coins sufficient for multiple meals from snack machines. Make sure to suction up debris within the seating area, lift off the floor mats, then thoroughly vacuum underneath them too. Apply your cleaning tool with bristles to both the dashboard and side doors. And remember not to overlook scrubbing and extracting dust from the useful storage compartments beside each door.
Vacuum As You Go
Many people who tackle car interiors themselves often begin by shampooing the carpets. This approach can be counterproductive since they'll likely soil these areas again when cleaning higher sections. A better strategy is to commence from above and progress downward. Start by vacuuming the roof liner, dashboard, center console, and side doors. Next, thoroughly clean all windows and remove dust from smaller spaces. Finally, use a detail brush to sweep away loose particles trapped in crevices.
Finish With the Glass
If you had previously cleaned the insides of your windows before tackling the dashboard and applying vinyl protectant, you'd likely need to do so once more. This is because professionals typically leave window cleaning for last. By doing this final wipe-down, you remove any stray cleaner or protectant residue left behind, resulting in perfectly clear windows.
Look After Your Leather
Leather interiors require particular care; they represent one of the more intricate elements of do-it-yourself auto detailing. It’s important to maintain them through regular cleaning and necessary repairs to extend their lifespan as long as you can.
Clean the Leather
It might seem drastic, but for those with leather seats, purchasing a leather-care kit and keeping it in the car could be beneficial. Promptly cleaning any spills will enhance your likelihood of successfully removing them entirely. However, delaying this process allows substances like lipstick, ink, color transfer from clothes, and dyes from plastic shopping bags to become permanent stains within just one day.
Precondition the leather using a conditioner prior to beginning the staining procedure. Apply an ink remover onto the preconditioned leather surface and massage gently into it. Allow this mixture to rest for half a minute, then cleanse it off with a fresh piece of fabric. Finally, use both a leather cleanser followed by a layer of protective cream over the treated area.
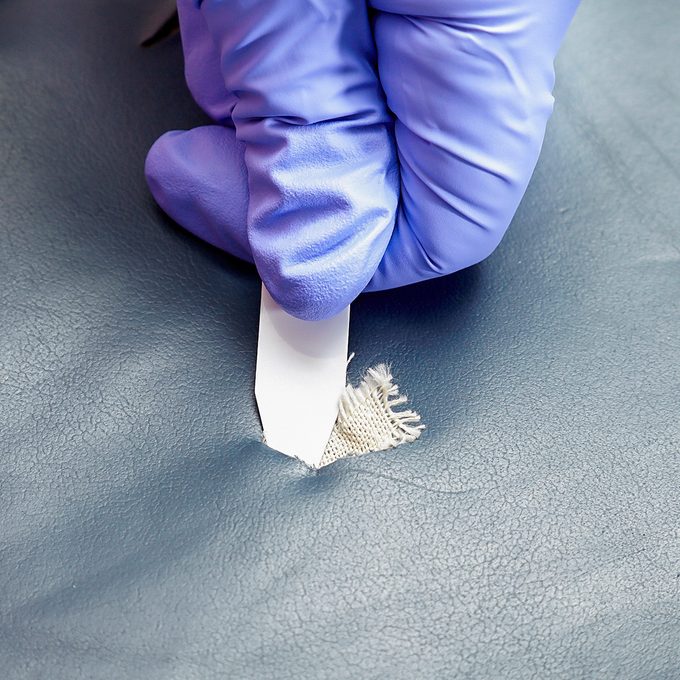
Repair Rips in Leather Seats
Severe damage necessitates the expertise of a professional. However, for minor issues and those looking to economize, self-repair might be an option. leather/vinyl repair kit It’s affordable, and the repair can be completed within an hour. Don’t count on achieving flawlessness though; you'll still notice the tear, and attaining an exact color match might not happen either. Nonetheless, this solution will prevent the tear from spreading further and make it appear more acceptable than a large open gash would.

Plastic and Vinyl
The plastics and vinyl in your vehicle also require care when you're tackling DIY car detailing. Applying some effort can significantly help maintain their appearance and cleanliness.
Washing
Use SEM Soap on vinyl and plastic surfaces and scrub them using a scuff pad. Pay special attention to textured and indented sections. Afterward, wipe the area with a fresh, slightly wet, non-linting cloth and allow it to air-dry.
Colorant
Apply multiple sheer layers of coloring agent, waiting 5 to 10 minutes between each spray. Avoid usage until the coating has dried completely after about 24 hours.
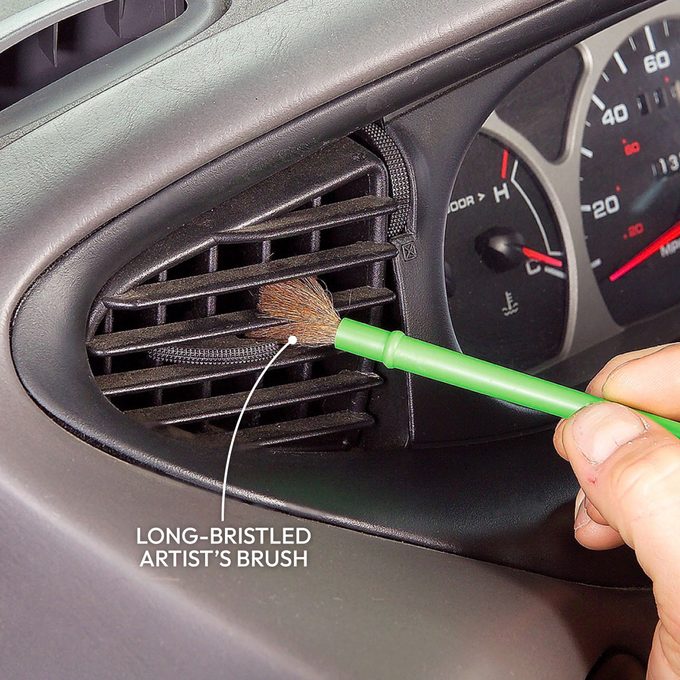
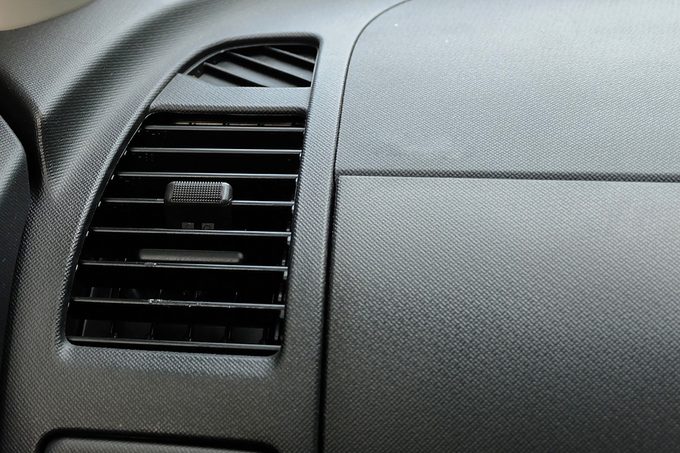
Clean the Air Vents
Louvers attract a lot of dust, and even using a vacuum cleaner with a brush attachment might not remove everything. Instead, take an affordable artist's paintbrush and spray some furniture polish onto it lightly. Then work the brush into the louvers. crevices To gather the dust. Clean the brush with a cloth and proceed to the following one.
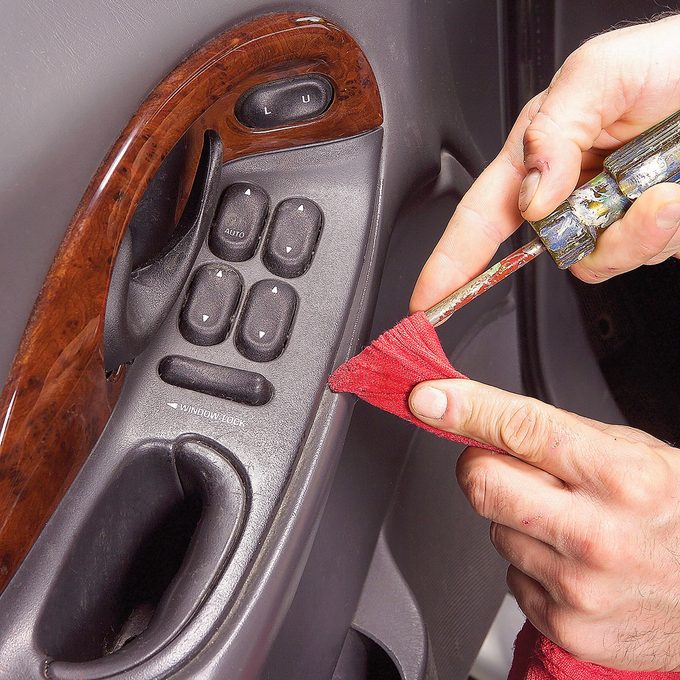
Make Sure to Tidy Every Corner and Crevice
While tackling a do-it-yourself car detailing project, addressing every crevice and trim line that regular cursory cleanings overlook becomes essential. To reach these areas effectively, wrap a fabric over a used but dull screwdriver tip (ensuring no sharp points). Spray some multipurpose cleaner onto this makeshift tool. Gently slide it along the grooves to remove accumulated dirt. Continuously refresh the cleaning area of your improvised tool. Also ensure to carefully maneuver through each button and control panel before applying a conditioner afterward.
Tidy the Rug, Fabric Furniture, and Velvet
Your carpets and upholstery endure significant wear. Grime, discolorations, and even smells tend to accumulate within the material. Keeping these areas clean ensures your vehicle remains fresh in appearance, scent, and texture.
Wash Carpet and Velour
Apply Plastic & Leather Prep onto the carpet or velure surface and gently scrub using a nylon-bristled brush. Allow it to air-dry before vacuuming.
Carpet and Velour Colorant
Apply coloring agent to the carpet or velvet, and promptly use a nylon-bristled brush to comb through the fibers in every direction so they remain separate. Allow time for drying. Afterward, brush once more and then vacuum.
Sweep and Vacuume Your Rug
Carpeting in vehicles tends not to release dirt easily during cleaning. While vacuuming is an excellent initial step, relying solely on this method leaves much residue behind. Professional Detailers employ a firm-bristled brush alongside their vacuuming efforts to dislodge additional grime from the carpets. This technique causes soil particles to rise to the top where they can be effectively extracted using a powerful shop vac as part of thorough vehicle detailing procedures.
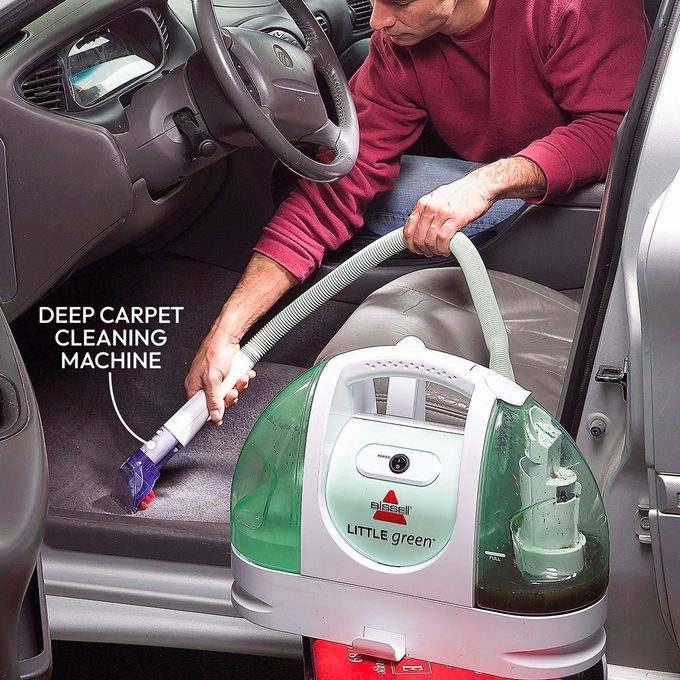
Deep-Clean Carpet and Upholstery
Should the vacuum and brush attachment fail to meet your needs, fear not. Opt for a carpet cleaning device designed to extract deeply embedded dirt within the fabric strands of carpets and upholstery. This tool injects a mixture of water and detergent onto the surface before extracting both the liquid and loosened debris back into a collection tank. Investing in such equipment often proves worthwhile following only a handful of applications. Alternatively, you might consider renting these machines at local rental outlets or employing a foam cleaner coupled with a manual scrubbing brush as an effective substitute method.
Swap Out the Carpet in Your Ride
Sometimes, when purchasing a "used" car, the interior carpets might be in terrible condition. Should they prove beyond repair with standard cleaning products, replacing them becomes necessary. Custom-fit carpets tailored to your specific car's make, model, and color are available; these can often be installed without professional help.
Replace Seat Covers
No matter whether you use your vehicle for transporting building supplies, shuttling children and grandchildren, or simply spilling copious amounts of coffee, you're well aware of how quickly stock seat covers can become dirty. Similar to the floor mats, at some point, the fabric inside your car may be irreparably stained. When standard cleaning solutions aren’t enough to salvage them and you wish to refresh your cabin’s appearance, you essentially have three choices: hire a specialist auto trimmer to replace your seating completely, purchase second-hand seats from a scrap yard, or acquire and fit new seat covers on your own.
The most budget-friendly choice among these three alternatives is an aftermarket seat cover. Installing them follows a comparable procedure regardless of whether your vehicle model differs. It usually requires approximately two hours to fit both the front and back seats. For this task, all you really need besides the seat covers themselves are a bent wire clothes hanger and adhesive tape; use these items to guide the securing straps beneath the plastic molding sections. All necessary components come packaged with the seat covers.
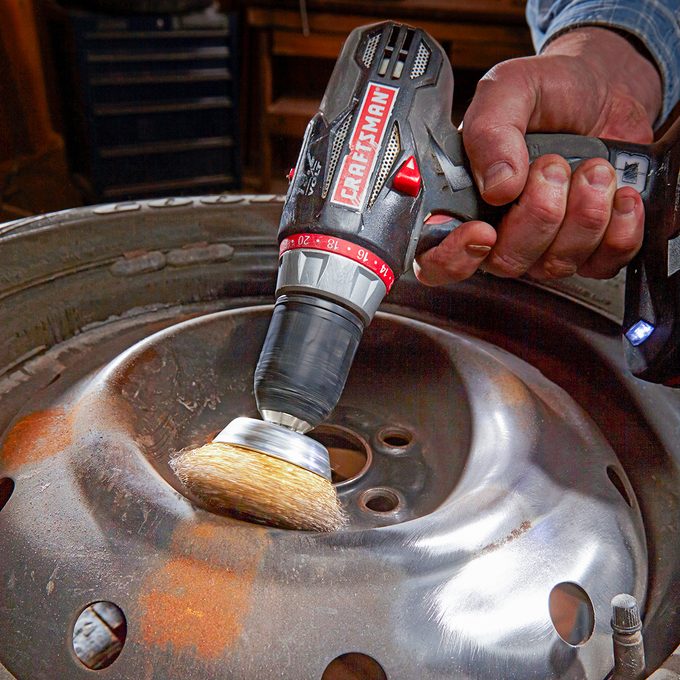
Refinish Wheels
Occasionally, an older vehicle might appear quite presentable apart from some worn-out rims and hubcaps. The good news is that you can address this issue without spending much money. You just need to spend a whole day scrubbing off the rust and applying new paint; most of this time will be spent allowing the paint to cure. Afterward, let the freshly painted wheels sit undisturbed for another 24 hours before reinstalling them.

Fix Paint Chips and Shield the Coating
Drive your car for an extended period, and inevitably you'll find yourself in a windy zone or trailing a vehicle stirring up dust and pebbles. Suddenly, you're dealing with numerous small projectiles. crackers embedded in your paint job These blemishes might expand to reach the size of quarters within just a couple of years. When talking about vehicle maintenance, this particular job often comes up during discussions on car detailing; however, surprisingly enough, you can handle this task yourself as well.
Pluck the Finish
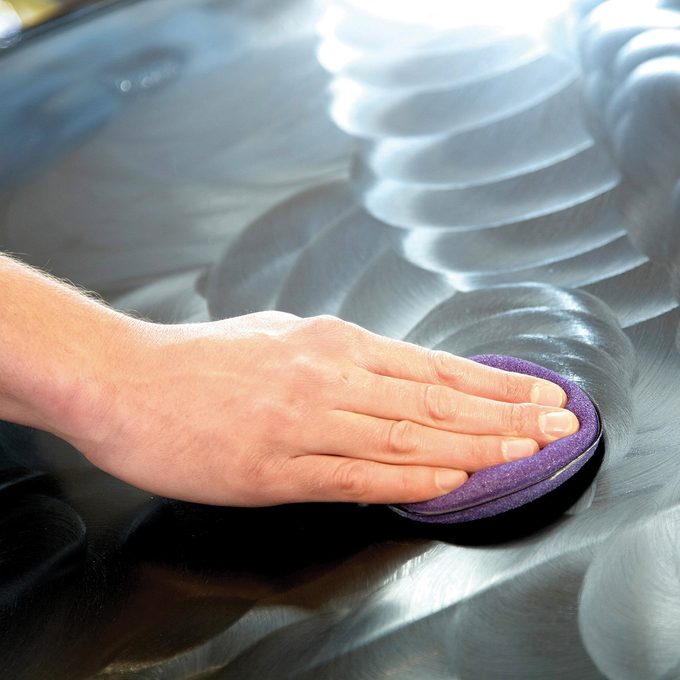
Your car's clear coat keeps away some particles but may still trap more abrasive bits. Regular washing takes care of exterior dust, yet using a clay bar is the sole method to extract what's deeply lodged in the paint.
Purchase a clay bar kit which comes with a lubricating spray and multiple sheets of synthetic clay. Take out a single sheet from the pack and tear off about a quarter portion. Mold this part into a flat disc shape within your hands and glide it across the car’s surface using smooth, side-to-side motions. Continuously fold, work, and flatten the clay as it becomes contaminated; once it appears greyish, discard it for a clean segment until all contaminants have been removed and the vehicle achieves a mirror-smooth appearance.
Repair Small Paint Chips
Address this issue promptly, and you'll avoid spending significant funds down the line, along with the potential shame of driving an early wrecksale vehicle. Using appropriate primer and touch-up paint, you can repair these dings on your own. Just make certain to initially cleanse and degrease the area to ensure proper adhesion for both the primer and paint.
The solution provided here works for new chips that haven't begun to corrode yet. Should you notice any rust spots or dents alongside your chip, you'll require a more complex repair method. Remember that this fix might show some visibility upon closer inspection; however, selecting an appropriate touch-up shade should make it indistinguishable from several feet away.
Polish the Finish
A lot of vehicle owners often mistake polishing for waxing. However, these are distinct processes. Polishing eliminates minor surface flaws and scratches and gives the paintwork a gleaming polish. On the other hand, waxing enhances the sheen further and shields the exterior from environmental damage.
Many people who tackle projects themselves avoid polishing since they're not keen on spending money on a polisher or putting in the effort for manual polishing. However, polishing your car's exterior is essential for achieving maximum shine. Place a small amount of polish onto the applicator pad and evenly distribute it over a 2x2-foot section. Start with a low speed setting to ensure even distribution of the product. Once the polish covers the surface uniformly, increase the speed so the machine can handle most of the labor.
Remove Minor Paint Scratches
Select 3,000-grit sandpaper, rubbing and polishing compound, along with polishing pads. Additionally, you will require either a handheld drill or a dual-action (DA) polisher tool. These items can typically be purchased directly from automotive supply stores.
Apply a Protective Film
Low-profile hoods and streamlined side mirrors on modern vehicles are highly susceptible to paint chipping due to small stones and debris hitting against them. Dealers often cover these areas with a transparent, flexible protective layer to safeguard the finish; however, this service comes at a premium cost. Alternatively, you can acquire this film online and fit it yourself within several hours at a fraction of the price. While the process isn’t overly complex, it requires some skill to master. Therefore, consider buying additional sheets specifically for practicing on your car’s mirrors before tackling larger sections like the hood. After getting accustomed to applying, extending, and smoothing out the material across your mirror surface, working on the hood will become considerably simpler.
Apply Paint Sealant
Applying paint sealant is also a wise choice; however, you can readily do it yourself and avoid the expense associated with having a dealership or detailing professional handle it.
Remove Those Irritating Stickers
Every sticker from your national and state parks might remind you of wonderful experiences, yet their buildup could pose a visual distraction. High-quality ones usually come away easily when you manage to lift a corner and gently peel them back at a right angle. However, some may leave behind sticky remnants and demand extra care during removal. Place an old towel over your dashboard for protection before applying a degreaser with gentle blotting. Afterward, scrub and clean the area accordingly.
Lubrication
If your doors and windows begin to operate sluggishly or produce squeaking noises, it indicates that they require lubrication. This task is among the simpler ones for self-car detailing; all you need is a lubricant and some clean cloths.
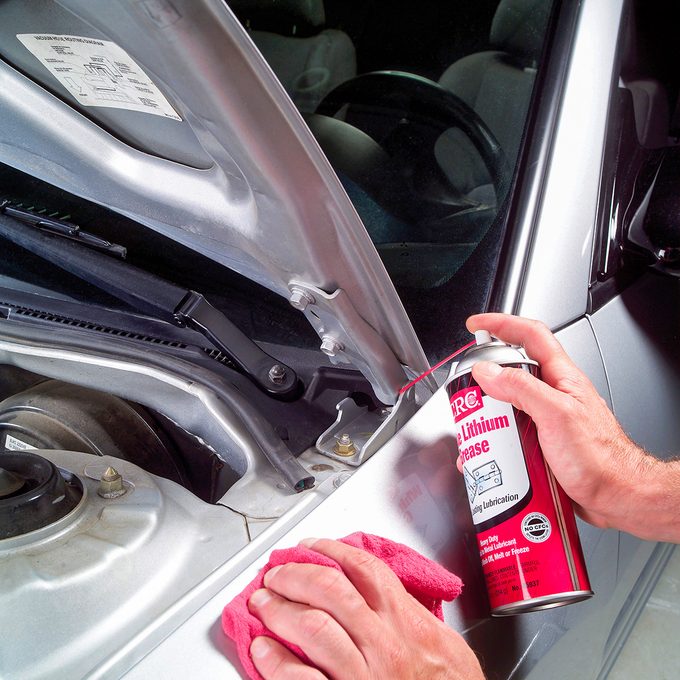
Hood Hinges
Wipe the hinge area with a clean rag and spray it with white lithium grease or a few drops of ordinary motor oil. Move the hinge several times to work the grease into the hinge. Be sure to get it into both sides of each hinge. Wipe away the excess to keep it from collecting debris.
Trunk Hinges
Apply grease to the trunk hinges using the technique applied for the hood hinge. However, avoid greasing the gas struts that control the speed of the trunk’s opening as this might damage them.
Window Tracks
Apply silicone spray or dry Teflon to the window tracks. The silicone remains slippery even when temperatures drop, ensuring smooth operation of the windows and reducing strain on your window motors.
Door Weatherstripping
Apply spray silicone to every piece of weather stripping. This will stop ice from adhering the rubber to the metal frames of your doors. Doing so ensures easier door operation and could also avoid tearing in the weatherstripping.
The Gas Tank Lid
The gas tank cover endures quite a lot of wear, particularly in areas with salt exposure. To protect it from corrosion, spray some WD-40 on it several times annually. Make sure to remove any extra lubricant so it doesn’t drip onto your vehicle’s paintwork, which could otherwise lead to additional cleaning tasks.
Include Graphite in Door Lock Maintenance
It’s only when we encounter issues like a broken-off key inside the cylinder that we pay attention to our door locks. To keep those intricate locking systems functioning smoothly, apply some dry graphite powder directly onto them. If necessary, gently move aside the dust cover using a slim metal nail file to access the lock interior. Simply press down once on the graphite canister for an adequate amount. Insert your key then turn the lock multiple times to ensure the powder spreads evenly throughout the mechanism. Don’t forget to do the same thing for your trunk lock too.
Clean the Hood Latch
Use a clean cloth to remove the grime and dirt. Make an effort to eliminate any grains of sand that might be lodged within the present grease. Should you notice rusty or jammed components, apply some WD-40 onto the latch, followed by moving the mechanism multiple times. Clean it once more before generously applying white lithium grease.
Eliminate squeaky doors
Should your door emit an unpleasant screech each time you attempt to access it, this may indicate rust has seized up the hinge mechanisms. To remedy this issue, apply some WD-40 directly onto these rusty areas, oscillating the door back and forth repeatedly until the lubrication penetrates effectively. After ensuring all components within the joint function smoothly again, coat everything once more using either white lithium grease or engine oil, repeating the motion before cleaning off any surplus material left behind. Inspect the locking mechanism next; modern locks often incorporate parts made from materials like plastic rather than metal, requiring only a burst of silicone-based spray as their form of maintenance.
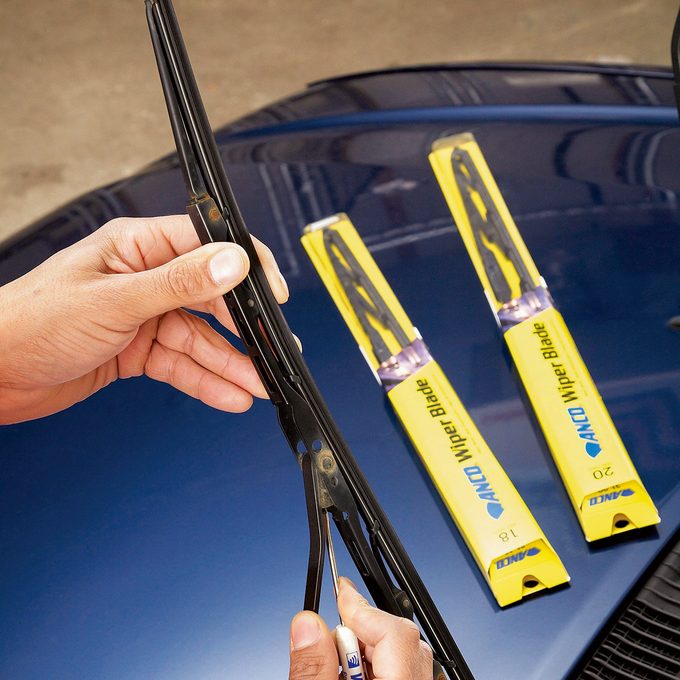
Replace Wiper Blades
It’s straightforward to determine when your wiper blades require replacement. Just activate the wash cycle and observe whether the blades clear the water effectively. If they leave streaks, it indicates they should be replaced. At the auto parts store, you'll find numerous budget-friendly options; however, choose a reputable brand for your vehicle detailing task instead. Although these premium blades come at a higher price point compared to basic ones, they offer superior performance due to better quality rubber, enhanced UV resistance, and extended durability. While opting for high-quality blades might bring the expense closer to what professionals charge, doing so can help maintain consistency in the outcome without adding additional costs for labor.
Utilize a Non-Silicone Matt Finish Dashboard and Vinyl Protector
Silicone dashboard protectant sprays create a smooth coating that tends to gather additional dust, making cleaning necessary more frequently. Moreover, a glossy dash can cast reflections onto your windscreen which may impair visibility, particularly during nighttime driving. This is why experts opt for non-silicone matte finish protectants when polishing vehicles; these products maintain an attractive appearance without increasing glare.
Waxing
One essential part of car detailing involves waxing, which you can easily do yourself. Many enthusiasts vouch for carnauba wax because it gives a rich, warm glow. However, we favor the glossy, water-soaked appearance provided by modern synthetic polymer waxes, often referred to as paint sealants. These are more expensive compared to others, yet they avoid leaving a whitish residue on plastics or trims—an undeniable benefit. Additionally, these waxes are straightforward to use. Simply spread the wax onto a foam pad using a circular motion before buffing away the excess with a microfiber cloth. Replace your cleaning cloths once they become saturated.
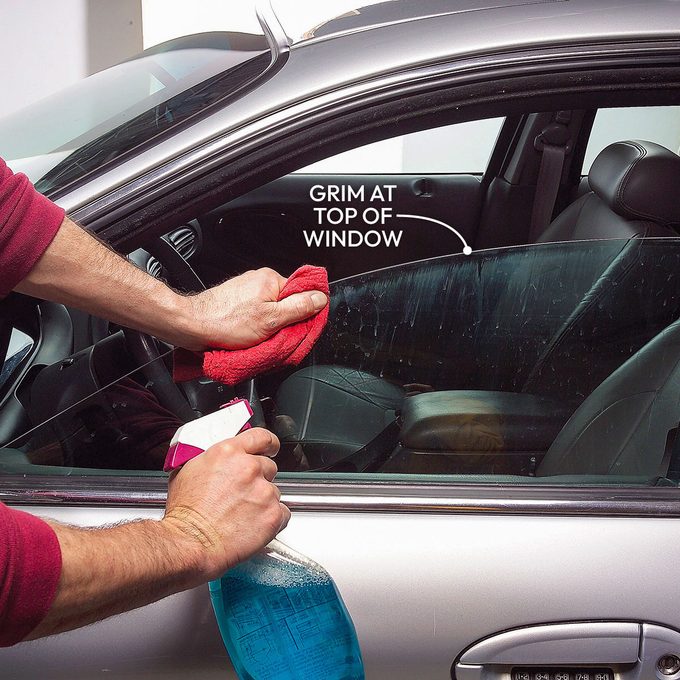
Glass
Have you ever noticed the dirty streak at the top of the window when it’s only partly lowered? Many folks skip cleaning this area during a basic car wash. However, tackling this small task can significantly enhance how your windows appear after some do-it-yourself auto detailing. All you really need is a bit of time—just a few minutes—and some Windex along with a fresh cloth.


Comments
Post a Comment